Configuring Nikon Camera Control Pro 2 software for use with DSLR (digital single lens reflex) Cameras
The Nikon Camera Control Pro 2 software provides remote access to and controls most functions of Nikon DSLRs. The camera must be connected to a computer that is connected via USB cable or through wired or wireless LAN (using a wireless transmitter). The application also provides a live view for preview function. For optimum use of the Camera Control Pro 2 software, the View NX2 software must also be installed on the computer. (The View NX2 software enables the user to view full-screen images captured using the Camera Control Pro2 software. More specifically, the View NX2 software allows the user to use the entire window and zoom in to view the images – down to pixel level – to ensure that the image was captured properly.
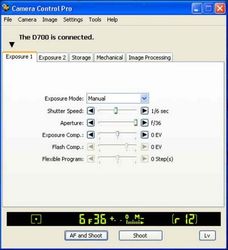
First, install the Nikon Camera Control Pro 2 software and the View NX2 software using the disk provided. Next, make sure the camera is connected to the computer and turned on. Click on the Camera Control icon on the desktop. A dialog box similar to the following will appear on your computer screen.
| Note |
|---|
Please be advised that this article is not intended to replace the Nikon user manual, but is intended solely to identify those settings that should be configured during the set up process to optimize use of the system. It is incumbent upon the user to become familiar with the settings not specified in this article by using the user guide supplied with the Nikon software. |
Menu Bar – Camera Settings
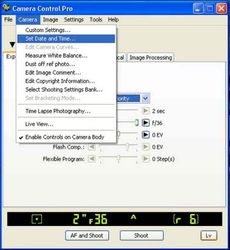
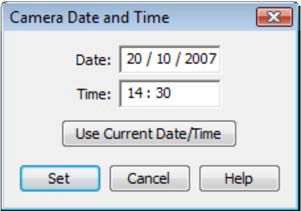
From the menu bar, select Camera and then choose Set Date and Time. Follow the on-screen instructions to set the date using the date from the computer.
To view the current time and date set tings, click Use Current Date/Time. Click Set to set the clock calendar to the time and date shown.
Next, turn off the controls on the camera body. From the menu bar, select Camera and then choose Enable Controls on Camera Body.
| Note |
|---|
The camera controls on the physical camera should not be used to eliminate the possibility of shaking and/or moving the camera. By default, the camera controls are enabled every time the Camera Control Pro 2 program is started. Therefore, you must turn off the camera controls each time you use the camera. (A checkmark will not appear to the left of the “Enable Controls on Camera Body” when the controls on the camera body are disabled.) |
Menu Bar – Tools Settings
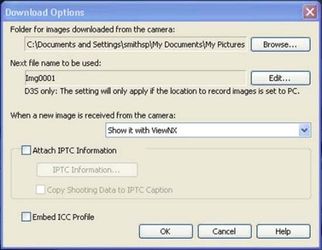
Next, set the download options. From the Tools menu, select Download Options ….
Use the Browse function to navigate to the location where the user wants to save his/her images. By default, the files are downloaded into the user’s Pictures folder (library) on the computer that is connected to the camera. If the computer is a shared workstation, it is recommended that each user set up a folder that is not accessible by others using the same workstation. Click on Browse and then using the Windows navigator, select the location (drive and/or folder location) where the images will be stored. Then click OK to accept the chosen location.
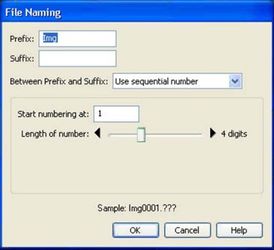
After setting the location where the files will be stored, specify the name that will be used for files captured using that camera and workstation. Click on the Edit button, and the File Naming dialog box will be displayed as shown.
Specify the Prefix that will be used to quickly identify images taken using the digital camera. It is recommended that you use a prefix such as DSLR, Image, IMG, etc.
Choose “Use sequential number” in the field labeled Between Prefix and Suffix, and then set the starting number to 1.
The length of the file name can be adjusted as desired using the slider bar for Length of Number. (Using the option for 4 digits is typically the preferred setting.)
Then click on the OK button in the lower right corner of the File Naming dialog box, and the Download Options dialog box will be displayed.
In the Download Options dialog box, choose “Show it with ViewNX” from the list box under the option labeled “When a new image is received from the camera”.
Then click on the OK button in the lower right corner of the Download Options dialog box and the Camera Control Pro dialog box will be displayed.
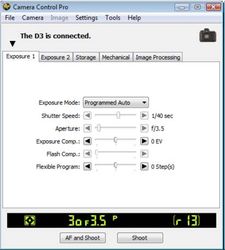
Next, set up the picture controls. Using the tabs that appear across the top of the dialog box below the menu bar, click on the desired tab (function) to display the appropriate settings.
Exposure 1 Tab
While the standard camera settings are the responsibility of the user, the following information is provided for additional reference when setting the camera parameters.
On the Exposure 1 tab, choose an exposure mode. For best results, it is recommended that the user choose either Aperture priority or Manual for the “Exposure Mode” once the camera controls are disabled. (Alternatively, if the image is of sufficient quality, you may also set the Exposure Mode to Programmed Auto.)
| Note |
|---|
Exposure compensation is useful when shooting objects with sharp lighting contrasts, or on other occasions when you want to modify the exposure value determined by the camera. |
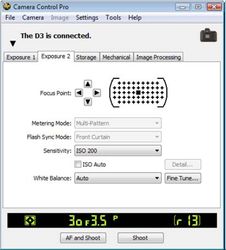
Using the Exposure 2 tab, the user can select various focus points. However, it is recommended that the user not specify a focus point using this technique as the Live View function provides an option for adjusting the focus point visually.
Exposure 2 Tab
White Balance settings can be adjusted on this tab, but it should be remembered that the White Balance setting can be adjusted later using the Camera Raw Converter in Adobe Photoshop.
Storage Tab
Please be advised that following settings are the recommended settings in accordance with best practices for the digital capture of evidentiary photography.
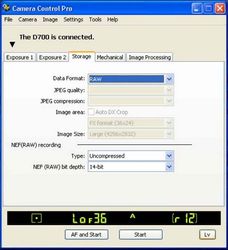
For Data Format, choose RAW. (The JPG file format settings from JPEG quality to Image Size will be disabled.)
In the NEF (RAW) recording section, choose Uncompressed. (Using the lossless compressed setting will cause some of the brightness (intensity) values in the highlights and midtones to be lost.)
Next, choose 14-bit for the NEF (RAW) bit depth setting.
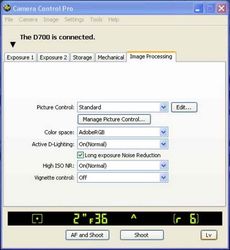
Image Processing Tab
Click on the Image Processing tab to configure the image control / processing options displayed.
The Picture Control function allows users to adjust color or monochrome settings automatically and create custom controls for sharpening, contrast, brightness, etc. We do not recommend changing the Picture Control settings for purposes of digitally photographing forensic evidence.
From the Color space drop down list, choose AdobeRGB for the correct image color management profile.
In the Active D-Lighting list box, select On (Normal).
| Note |
|---|
Active D-Lighting optimizes high contrast images to restore the shadow and highlight details that are often lost when strong lighting increases the contrast between bright and dark areas of an image. It can be set to operate automatically or manually, and it is also possible to bracket pictures to get one with Active D-Lighting and one without. |
A checkmark should appear in the Long exposure Noise Reduction. This setting really only makes a difference for shots using long exposure shots, such as laser shots.
In addition, in the High ISO NR list box, select On(Normal).
| Note |
|---|
The imaging sensors in all digital cameras experience “noise” when a higher ISO speed is used on a DSLR camera – the equivalent of visualizing “grain” when using highspeed film.) To maximize effectiveness of the imaging sensor, you should limit the ISO setting to no higher than 200. (If ISO 400 or higher is used, try to overexpose by ½ stop. |
In the Vignette control list box, choose Off.
Once these parameters are set, you can typically forget about having to reset them. However, it is recommended that you periodically verify these settings and parameters to ensure that they have not been changed inadvertently.
Now you are ready to take pictures.
